Hello Reader,
This post is about a very useful SharePoint JQuery Library.

Logo is taken from: http://spservices.codeplex.com/
I have used this library to build Custom SharePoint Page to generate a monthly report page that will list a set of approved request for a selected month.
So here the step by step explanation of how I did it.
Components Used
1. SharePoint Custom List
2. SharePoint Custom HTML Page
3. Javascript Libraries : JQuery, SPServices, DateJS
SP List definition is as follows
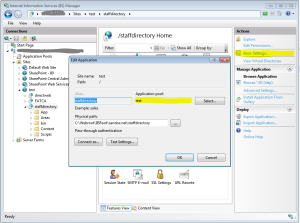
4. Three Share point Forms to override the default New/Edit/View Page
5. One HTML form for the Site Owner/Approver to edit or approve an entry.
6. Custom Report Page which will show approved entries for the selected month.
Following are the main the client side methods in the Report Page:
$(document).ready() => page load event does the following things
1. Create a dropdown list with current and past 5 months.
I have used Datejs, this is an open source JavaScript Date library for parsing, formatting and processing.

Source: https://code.google.com/p/datejs/
2. Attached an on change event on the Month dropdownlist, which will pull the list data for the selected month from the above Sharepoint List using SPServices library methods
3. A method to query the SharePoint List to get the approved items for the selected month, $().SPServices made my job easy, thanks a lot Marc D Anderson & Team.
$(document).ready(function() {
populatMonthDDL();
GetApprovedItems();
});

function GetApprovedItems(){

var titleField = "<FieldRef Name='Title' />";
var datField = "<FieldRef Name='Date' />";
var statusField = "<FieldRef Name='Status' />";
var createdByField = "<FieldRef Name='Author' />";
var pmField = "<FieldRef Name='Project_x0020_Manager' />";

var viewFields = "<ViewFields>" + titleField + datField + pmField + statusField
+ createdByField + "</ViewFields>";

var ifApproved = "<Eq><FieldRef Name='Status'/><Value Type='Text'>Approved</Value></Eq>";
var GeqSelectedMonth = "<And><Geq><FieldRef Name='Date'/><Value Type='DateTime'>" + selectedMonth + "</Value></Geq>";
var LeSelNextMonth = "<Lt><FieldRef Name='Date'/><Value Type='DateTime'>" + NextMonth + "</Value></Lt></And>";

var queryText = "<Query><Where><And>" + ifApproved + GeqSelectedMonth + LeSelNextMonth + "</And></Where></Query>";
$().SPServices({
operation: "GetListItems",
async: false,
listName: "CustomRequestList",
CAMLViewFields: viewFields,
CAMLQuery: queryText,
completefunc: populateData
});
}
Don’t worry about writing long CAML query and debugging it at client side, you can use Simple CAML Query to write, test and make your query perfect.
Source: http://www.sharepointhillbilly.com/Lists/Posts/Post.aspx?ID=8
Be careful while mentioning the List Field names
The column names should be the InternalNames for the columns, which might look like “My_x0020_Column”, as special characters like spaces are encoded. In this case, the space becomes “_x0020_” because a space is ASCII character 20 (hexadecimal). Seehttp://www.asciitable.com/ for more info.
The easiest way to identify the InternalName for a column is to go to the List [or Library] Settings, click on the column name, and look on the end of the URL, which will end with something like this in SharePoint 2007:
/_layouts/FldEditEx.aspx?List={37920121-19B2-4C77-92FF-8B3E07853114}&Field=Sales_x0020_Rep
or this in SharePoint 2013:
/_layouts/15/FldEdit.aspx?List={F3641DF3-80A2-4BBA-A753-E6BFB3FD98E4}&Field=ImageCreateDate
Your column’s InternalName is at the end of the URL after “Field=”.
Note that regardless what you specify in the CAMLViewFields, you will get some additional columns even though you don’t want them, including the item’s ID.
Source: http://sympmarc.com/2013/10/16/single-page-applications-spas-in-sharepoint-using-spservices-part-2-getlistitems/
4. Finally a small piece of java script to format the page, div containing the list data will be visible, script will hide SharePoint Mater Page and other page elements while printing. This event is attached to a print button on the page onclick = “printContent(‘reportDIV’)”
var isPrinting = false;
function printContent(el){

var container = document.getElementById(el),
origDisplay = [],
origParent = container.parentNode,
body = document.body,
childNodes = body.childNodes,
i;

if (isPrinting ) { return;}// block the button while in printing mode
isPrinting = true;

for (i = 0; i < childNodes.length; i++) {// hide all body content
var node = childNodes[i];
if (node.nodeType === 1){
origDisplay[i] = node.style.display;
node.style.display = "none";
}
}

body.appendChild(container);
window.focus();
var onPrintFinished=function(printed){ //function triggers when window.print() is finished
origParent.appendChild(container); // put the masterpage and other content back in
for (i = 0; i < childNodes.length; i++) {
var node = childNodes[i];
if (node.nodeType === 1) {
node.style.display = origDisplay[i];
}
}
isPrinting = false;
}
onPrintFinished(window.print());//Execute print command
}
Hope this will help someone. Thanks for reading 🙂